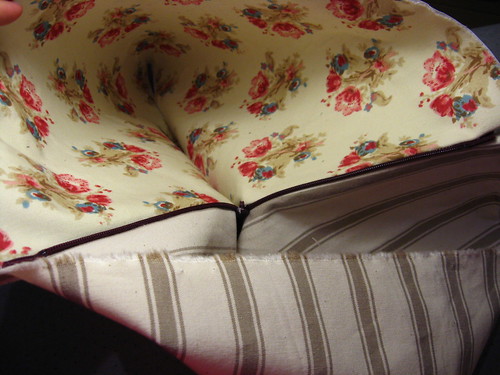
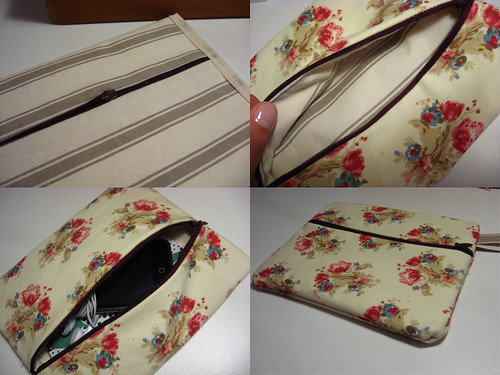
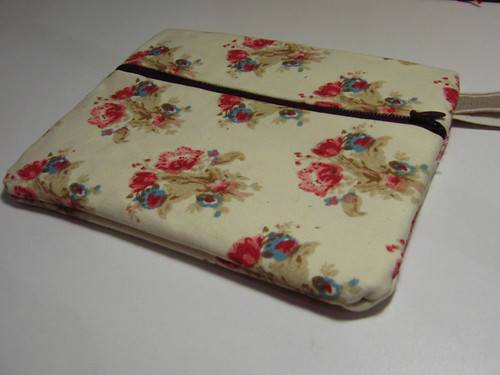
I love travel size toiletries. I think this may date back to my days of playing with Barbie® dolls and trolls. Everything was so little and cute. In fact, most things are more adorable in a mini size: people, puppies, muffins... and little bottles of shampoo, deodorant and lotion. Our Travel Tidy Cosmetics and Toiletries bag is the perfect size to fit all those tiny bottles and jars and more. We used one of the four lovely laminates from Anna Maria's Loulouthi collection as our inside fabric choice so if anything leaks, it can be quickly wiped clean and won't bleed through to the pretty exterior fabric.
This project falls into the 'intermediate' category, because it takes some futzing, twisting and turning to insert a zipper into a tube shape and to stitch the exterior and lining fabrics independently into boxed corners. I don't say this to scare you off at all, but if you are new to sewing, you might want to make a prototype first out of scrap fabrics to practice. Then you can graduate to your real fabrics with more confidence in the steps. Next thing you know, you'll be making these bags for all your friends because it now seems so easy!
We've used a similar zipper technique in several other Sew4Home projects, and these earlier tutorials have additional step-by-step photos, which may be useful if you are just starting out. Check out our: Wristlet, Make-Up Pouch, Pencil Case and Coupon Holder.
Our Travel Accessories series is sponsored by Free Spirit Fabrics, as part of our Artist Trio Series introducing Anna Maria Horner's amazing Loulouthi fabric collection. You can find Loulouthi at Fat Quarter Shop, CityCraft, Fashionable Fabrics, and Fabric.com.
Sewing Tools You Need
- Any Sewing Machine (we recommend the Janome Memory Craft 11000 Special Edition)
- Zipper foot
Fabric and Other Supplies

- 1/3 yard of 44-45" wide print fabric for the main exterior of the bag: we used Loulouthi Coreopsis in AH43-Sugar
- 1/3 yard of 44-45" wide print fabric for the exterior accent panels of the bag as well as the handle and tab: we used Loulouthi Hugs and Kisses in AH45-Pink Lime
- 1/3 yard of 54-55" wide laminate for the lining of the case: we used Loulouthi Framed in OCAH07-Citron
- 1/3 yard of lightweight batting (regular batting not fusible)
NOTE: Cuts are 12", which is exactly 1/3 yard. If you are worried about accuracy or want to have enough for a special fussy cut, use ½ yard cuts. This amount of fabric would actually provide enough yardage to make TWO bags. - One 12-14" plastic zipper in coordinating color: we used light pink
- Approximately 8" of 1/8" satin ribbon for zipper pull: we used light pink
- All purpose thread to match fabric
- See-through ruler
- Seam gauge
- Fabric marker, pen, or tailor's chalk for marking fabric
- Iron and ironing board
- Scissors or rotary cutter and mat
- Straight pins
- Small piece of wax paper
Getting Started
- From the fabric for main exterior (Loulouthi Sugar in our sample), cut ONE 13" high x 12" wide rectangle.
- From the fabric for the exterior accent panels, handle and tab (Loulouthi Pink Lime in our sample), cut the following:
TWO 2½" high x 12" wide rectangles
ONE 3" x 10" strip - From the fabric for the lining (Loulouthi Citron laminate in our sample), cut ONE 16" high x 12" wide rectangle.
- From the lightweight batting, cut ONE 16" high x 12" wide rectangle.
At Your Sewing Machine & Ironing Board
- Press all your fabric cuts as it will be hard to press the bag when finished.
NOTE: I'll go on the record here to say that pins do leave holes in laminate, but I'm not worried about that fact for this project because all my pinning is being done within seam allowances so no holes will show on the finished bag. - Pin one 2½" x 12" accent panel on either end of the 13" x 12" main exterior piece. To do this, align the 12" sides of each, right sides together. Pin in place.
- Stitch together, using a ½" seam allowance.

- Open up the finished piece on your ironing board wrong side up and press both seam allowances towards the main exterior piece (the Loulouthi Sugar in our sample) .

- Return to your sewing machine and topstitch approximately ¼" from the seam on the main fabric side. You are stitching through all the layers (fabric and seam allowance) and securing the seam allowances in place.

NOTE: You can use a matching thread or a contrasting thread in your machine for this topstitching. We used a light pink. - We added our Sew4Home label at this point.


Insert the zipper and create a 'fabric tube'
- Place your batting flat on your work surface. Place your completed exterior piece right side up on top of the batting, matching all edges.
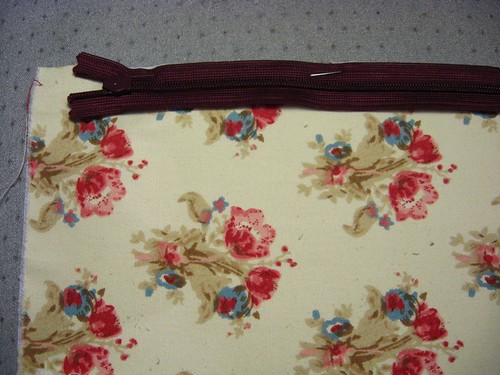
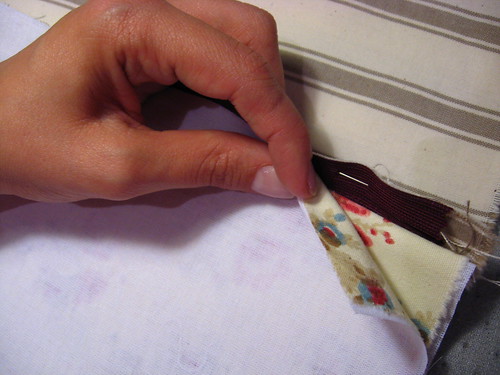
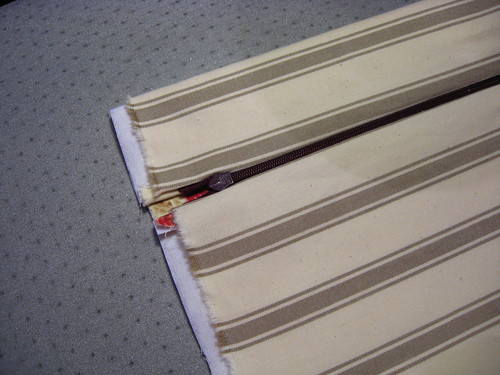
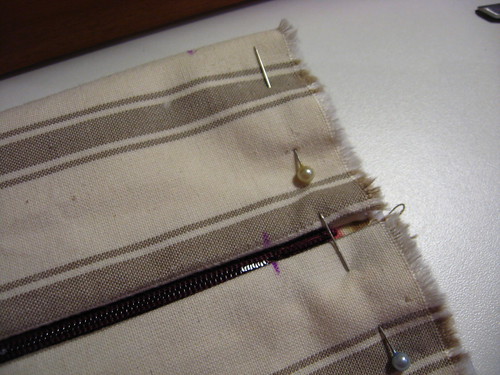
- Lay your zipper upside down on top of the exterior (the teeth facing down onto the right side of the fabric) along one 12" edge. The edge of the zipper tape should be even with the raw edges of the fabric and batting.

- Place the lining, right side down, on the top, sandwiching the zipper in between the layers. As above, align the top raw edge with the edge of the zipper tape. Pin through all the layers, being careful to pin through just the top of the zipper tape. You need to be able to open and close the zipper, which you can't do if you've pinned too low or through the teeth. Remove the pins as you go.

- Fold back the lining to reveal the zipper, and zip it open about half way.
- Fold the lining back down into position, and take the assembled layers to your machine.
- Attach your zipper foot. Align your needle so it is in the left-most position.
- Starting ½" from the edge, stitch through all the layers. Your seam will be approximately ¼"; you want to run your zipper foot as close to the zipper teeth as possible while still keeping all your layers nice and flat. Go slowly and gently hold the laminate taut.

- When you get to the middle, where you can start to feel you're approaching the zipper pull, stop with your needle in the down position. Twist your fabric around slightly and open up the layers so you can access the zipper. Be gentle! Carefully close the zipper. Re-position your fabric and finish sewing to ½" from the opposite edge.
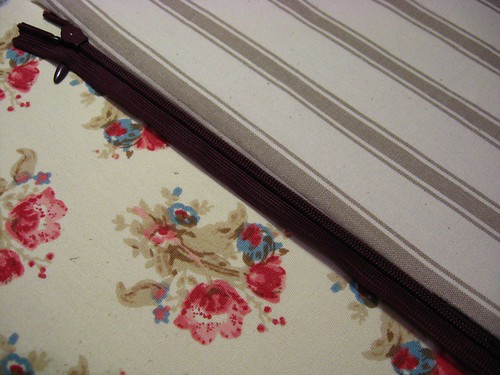
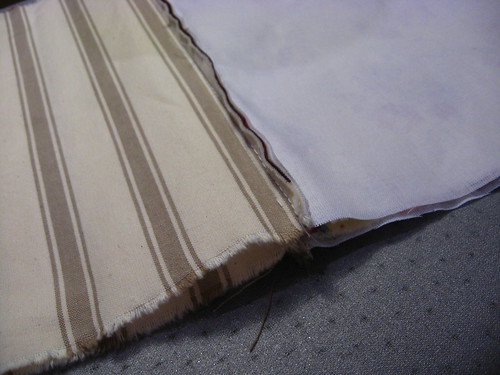
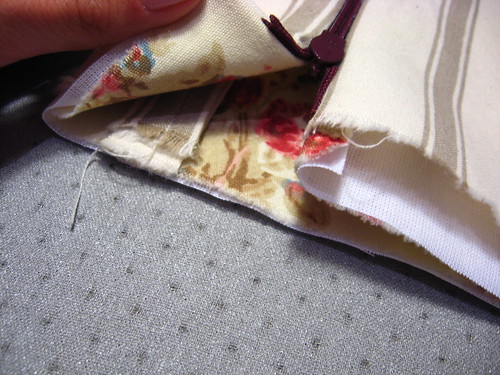
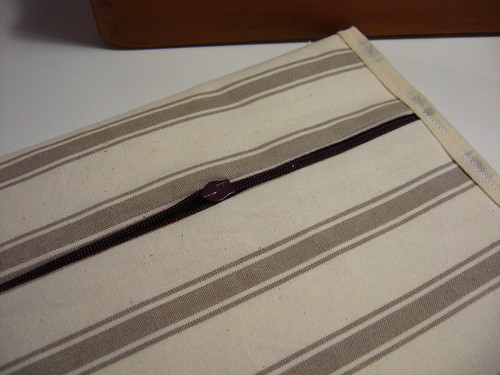
- When finished and open flat, you should now how a piece with the exterior fabric and batting on one side of the zipper and the lining on the other.
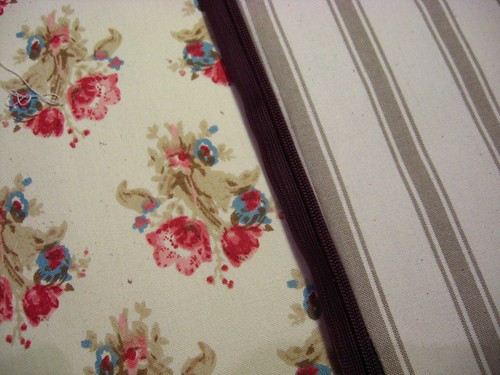
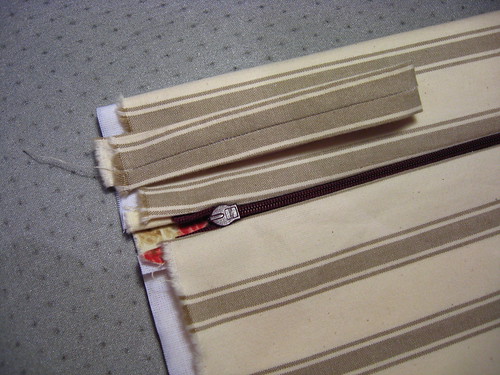
- Fold the layers together so that the wrong side of the lining is now against the batting and the un-sewn side of the zipper tape is standing straight up. Press from the fabric side; do not iron right on the laminate.
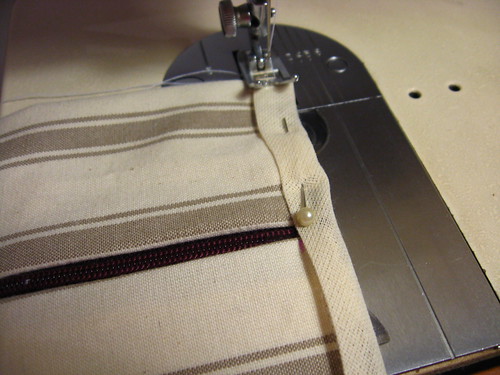
- Topstitch along the zipper, through all the layers, close to the edge of the fabric.
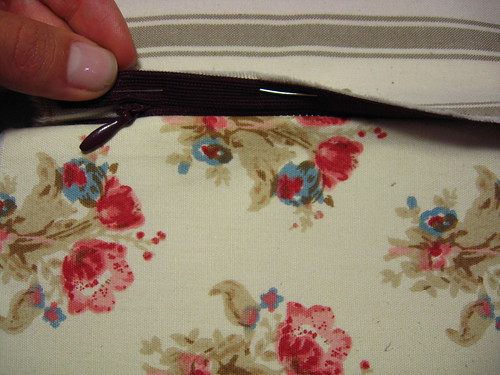
- Flip your fabrics to sew the other side of the zipper in place. Use the same order of layers as above in steps 1-3, and follow the same steps to attach.

- You have formed a tube, so it will be a bit more awkward to sew this side, but you can do it!


NOTE: As mentioned, we have a number of tutorials that use this zipper insertion technique. Check the links listed in the introduction above.


Make handle and tab
- Find the 3" x 10" strip.
- Fold the strip in half lengthwise (so it is now 1½" x 10") wrong sides together and press a center crease.
- Fold each long raw edge into the center to meet at the center crease. It looks like a piece of double-fold bias binding. Press well.

- Fold in half again along the crease so the two long folded edges are flush. Press well and pin in place.
- Stitch together, staying close to the folded edges and starting and stopping as close to each end as possible.

- Cut 2" off one end. This smaller piece will be the tab; the larger piece is the handle.
- Fold the tab in half and position it at the end of the zipper on the right side of the fabric/zipper. The raw edges should be aligned and the folded part of the tab should be facing in towards the middle.

- Machine baste the tab in place close to the raw edge.


Sides, corners and handle to complete
- Turn the bag inside out.
- With your hands, push the bag flat so the zipper runs down the exact center (similar to the photo above at the end of the zipper steps, but inside out).
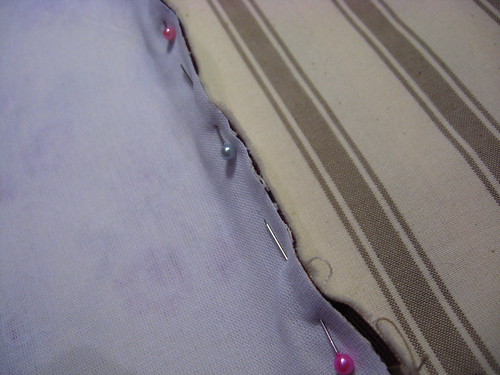
- Pin your layers right sides together: both SIDE EDGES of the exterior layers right sides together, both SIDE EDGES of the lining layers right sides together.
- Using a ½" seam allowance, stitch together in the same order: both side edges of the exterior layers right sides together, both side edges of the lining layers right sides together.

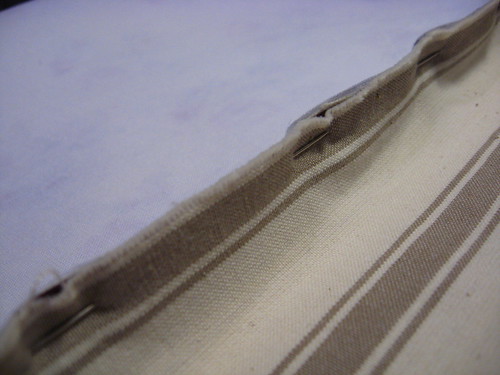
- Draw 1½" squares on each corner and cut out. Remember, you have eight corners - four for the exterior and four for the lining. Yes, you are cutting through the seam you just sewed. That's okay, the corner seams will re-secure the cut seams.

NOTE: If you have a good see-through ruler with markings, you can use this to draw your squares. If not, make a little 1½" square paper pattern and trace around it at each corner.

NOTE: We took the time to reinforce the edges of the fabric after cutting the squares so there would be no worries about unraveling edges. This is totally optional. - Find the remaining piece of the sewn strip, which is your handle. Bend it into a loop and place it on the opposite end from the tab on the right side of the exterior piece, aligning raw edges and with the loop facing in - as you did above with the tab. It should be placed so it will sit at the bottom edge of the end. If the loop seems a little long, simply adjust it to your desired length and trim off the excess.
- Pin the handle in place and pin seven of the eight corner layers together, leaving one of the lining corners open for turning.

NOTE: Pinning the handle in place should be fine. But if you worry about shifting layers, you could hand baste the ends in place. - Using a ½" seam allowance, stitch seven of the eight corners, again - remembering to leave that one lining corner open for turning.
- To seam each corner, pull the outside edges of your square down to flatten/straighten the seam.

NOTE: An alternate method to the above is to form a triangle first in each corner, then stitch and trim. You can review the following tutorials to see this option: Make Your Own Grocery Bags, Market Tote, and Boho Shoulder Bag among others. - Gently turn your bag right side out.
- To finish the edge of the last unsewn corner, turn both raw edges under ½". Match up these now folded edges and stitch closed from the right side.

NOTE: Because we used a laminate lining, we inserted a piece of wax paper between the pressure foot the laminate so the foot didn't stick to the laminate. Stitch right through the wax paper then simply tear it away when you're finished.

- Push the lining down inside the bag and adjust it into the corners. It will be a loose fit, which is fine. It makes it easy load up all your cosmetics.
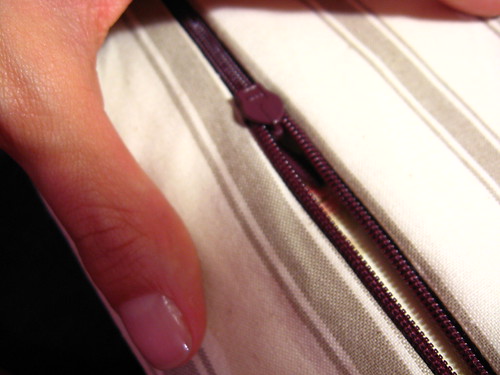
- Tie the stain ribbon into a loop through the zipper pull and knot off.


 Necessaire express
 Tempo
Tempo